Enrich your design: leaflet printing from Solopress

22 November 2012

Anaglyph 3D Photography and Film

It’s been a while since we’ve posted something on Inspiring Print so I thought I’d share a recent purchase of mine with you that brings an old form of visual entertainment into the current day.

Last week I was having a browse through Flickr to learn from other peoples’ impressive photos by studying the EXIF data of those that had it available. I learn to shoot a lot of different styles with my DSLR by studying photos and how they were put together before playing with the settings and adding my own twist.

As I was searching I came across several 3D images that needed a pair of glasses with a red lens and a cyan lens, otherwise known as anaglyph 3D glasses, in order to appreciate the 3D effect. In true spontaneous style I jumped onto eBay and ordered myself a pair of them – 2 pairs for £2.


Since they arrived today I have spent a good portion of the morning looking at the different types of 3D images that are on Flickr and videos that have been uploaded to YouTube and Vimeo using this anaglyph style of 3D image recording.

Overall I am impressed at the wealth of material available to admire online, considering that 3D viewing of this kind went out of fashion for a while until Real D came into cinemas with their polarization systems, which you’ve undoubtedly used within the past 5 years if you have watched a 3D film in the cinema wearing passive glasses.


There is one major problem with the anaglyph glasses though and that is that the colouration of your picture isn’t as true as it would be using a pair of Real D’s polarised glasses because of the different coloured lenses. On the other hand, you do need a 3D source such as a 3D monitor or cinema screen in order to benefit from using the passive polarised lenses, therefore, if you’d like to create a 3D video that is viewable through all devices then anaglyph is the only way to go for now.


5 Cool 3D Photos

If you’re fortunate enough to have a pair of your own anaglyph glasses then have them at the ready as I show you five of the most impressive 3D photos I’ve come across today on Flickr.

1. A telegraph pole that looks real enough you could climb it:
http://www.flickr.com/photos/parallel_yoshing/4435473954/sizes/z/in/photostream/

2. All aboard the HMS Victory, you can almost smell the sea air:
http://www.flickr.com/photos/stereoviews/4671782299/sizes/z/in/photostream/

3. Take a trip to the Thames and see the London Eye from the comfort of your armchair:
http://www.flickr.com/photos/stereoviews/4468225752/sizes/z/in/photostream/

4. Feel the warmth of a big bonfire through your red and blue glasses:
http://www.flickr.com/photos/stereoviews/4429479321/sizes/z/in/photostream/

5. Be careful not to roll down this wicked spiral staircase as you peer into the concrete tornado:
http://www.flickr.com/photos/stereoviews/5050067331/sizes/z/in/photostream/

Anaglyph 3D Videos

After looking at 3D photos I decided to spend a little time on Vimeo to find an impressive 3D video that I could share with you. This one of some robots playing football was the best one I came across:


There are plenty of others to watch, however, you will notice if you browse for yourself with a pair of these glasses that video quality is an important factor in the success of the 3D effect – the sharper the better. Pixelated videos just look like a mess, twice!


DIY 3D Anaglyph Images/ Video

There are a bunch of lenses and cameras on the market that you can buy to achieve this type of 3D image or video (Amazon: http://amzn.to/UUvH8d), however, there are tutorials available to teach you how to make your own 3D anaglyph images using one camera.


http://www.flickr.com/photos/sklathill/450378602/sizes/z/in/photostream/

It is preferred that the subject you are taking a photo of is stationary to make the 3D effect work. The process involves taking two photos (one from a left eye perspective, the other from a right eye), which can be offset from one another using a software package like Photoshop and involves further editing. You will of course need to be wearing your red and blue glasses whilst constructing it.

A handy tutorial to learn this from can be found here: http://www.diyphotography.net/create-3d-anaglyph-images. Judging by the author’s 3D image portfolio, this tutorial should be a simple method that provides you with tight and impressive 3D results.

All in all I’ve enjoyed my little trip down memory lane to when I remember being a young one and using the paper version of these glasses at my local cinema. I am pleased that this has improved with the help of Real D though because of the colouration issue.

I will be trying the DIY tutorial in an attempt to create my own 3D photo, which I will post on here if successful. Tweet us your own attempts if you decide to at @inspiringprint.

26 October 2012

The Evernote Smart Notebook by Moleskine: An Honest Overview

I recently witnessed a graphic designer friend of mine purchasing what I personally deemed to be one of the most ridiculously overpriced ways of digitising paper format information. Introducing the Evernote Smart Notebook, created in collaboration between Evernote and Moleskine.


Don’t get me wrong, Evernote is a brilliant note taking platform. I use it on a daily basis to sync notes via the cloud to all of my devices which saves emailing individual pictures and corresponding notes using separate programmes. But as you’ll notice from my tone, I’m not a great believer in the benefits that Moleskine’s Smart Notebook provide.

This new “innovative” notebook is available to buy in both small (A6-A7 size) and medium (A5-A6 size) from $24.95 on Moleskine’s website - the innovation being that you can use a smartphone loaded with Evernote’s application to take a photo of your handwritten notes and illustrations. Sounds like something I was doing 5 years back with my Nokia N95 and a £1 notepad from my local high street. But wait! There’s more.

The pages within the book aren’t your regular ruled lines. They are dotted ruled lines, which according to Evernote accurately skews your work once the app has read the dot pattern so that you eliminate the problematic slanted shot of a page. The other version of the notebook also contains pages with dotted lines but as a grid pattern - more suitable for graphic designers.


Another supposed benefit of this book & app combo is the removal of shadows from the photos you take of the notebook, however, as a photographer myself I’m not convinced by this. First of all Evernote advises that “using your flash ensures that you’ll get the highest quality image” (http://blog.evernote.com/2012/08/24/the-new-evernote-smart-notebook-by-moleskine/) in which case you won’t get a shadow - you can even try this now by taking a snap of a word on a piece of paper with your smartphone. Secondly, the automatic removal of shadow, if true, is an amazing innovation as in my experience this is quite a lengthy Photoshop process, which has lead to me just re-taking photos. Hmm?

Last but not least is my favourite selling point: stickers! Yes that’s right you get stickers which allow quick tagging of your pages. All you have to do is stick one on the appropriate pages and your notes are categorised into the corresponding notebooks that you’ve registered each of the stickers to. But what do you do when your stickers run out is my question? Costly methinks when you could do this manually via the app.

So what are my final thoughts on the Evernote Smart Notebook? Well the upside is that you get 3 months of Evernote’s premium service which gives you a whopping 1GB upload allowance per month as well as a few other service related features. The downside is I don’t understand who this notebook is targeted at. Serious graphic designers and illustrators will have their methods of digitising their creative work using tablets, scanners, and a range of software suites. So who?

Give us your thoughts on Evernote’s Smart Notebook. A new age designer’s essential or a flash in the pan waste of money?

23 October 2012

Blade Runner Poster Review (TuVie Day)

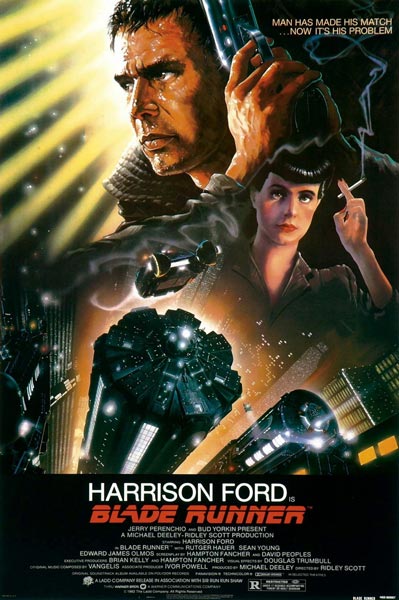
Directed by the brilliant Ridley Scott, Blade Runner is a fascinating film that was way ahead of its time and a good portrayal of the future city scenery that would be adopted by sci-fi films to follow in later years such as The Fifth Element and plenty of others.

The story follows the life of a Blade Runner named Deckard (Harrison Ford) – an agent that tracks down engineered humans, known as replicants in the movie, and terminates them in the year 2019. It’s a fairly standard cop hunts villains type of movie, however, they are also hunting for him, which adds another element of excitement to the plot.

Movie Poster Analysis

John Alvin, who also created the Gremlins and Star Wars Anniversary movie posters, created the movie poster for Blade Runner. The poster is an impressive piece of artwork, which identifies the replicants and the humans clearly and separately by adding sharper detail to the illustration of Deckard’s face in comparison to Rachael (the female character on the right) who is illustrated as a replicant through less sharpness and slightly thicker watercolours. She also looks similar to the Anime illustrations like Astro Boy.

The awesome scenery of the city tops is illustrated well to provide the reader with the futuristic element of the film and the punchy one liner “Man Has Made His Match…Now It’s His Problem” subtly opens you up to the theme of androids effectively.

Overall, the movie is perfectly illustrated in this poster and doesn’t leave too much to the imagination so as a first time viewer of it you’d get the gist of what it is all about.

Share This Page